 *
*

Bluetooth technology enables wireless communication between devices over short distances,
making it essential for modern embedded systems.
STM32 microcontrollers offer robust Bluetooth capabilities
that allow your projects to communicate with smartphones,
computers, and other Bluetooth-enabled devices without physical connections.
This tutorial introduces you to the fundamentals of implementing Bluetooth
communication on STM32 microcontrollers.
We'll cover both Bluetooth Classic and Bluetooth Low Energy (BLE),
explain the hardware requirements,
and walk through practical examples to help you integrate wireless connectivity into your projects.

PCBA Design File download:
/upload/202601/10/202601101031240537.zipUnderstanding Bluetooth on STM32
STM32 microcontrollers support Bluetooth connectivity through two main approaches:
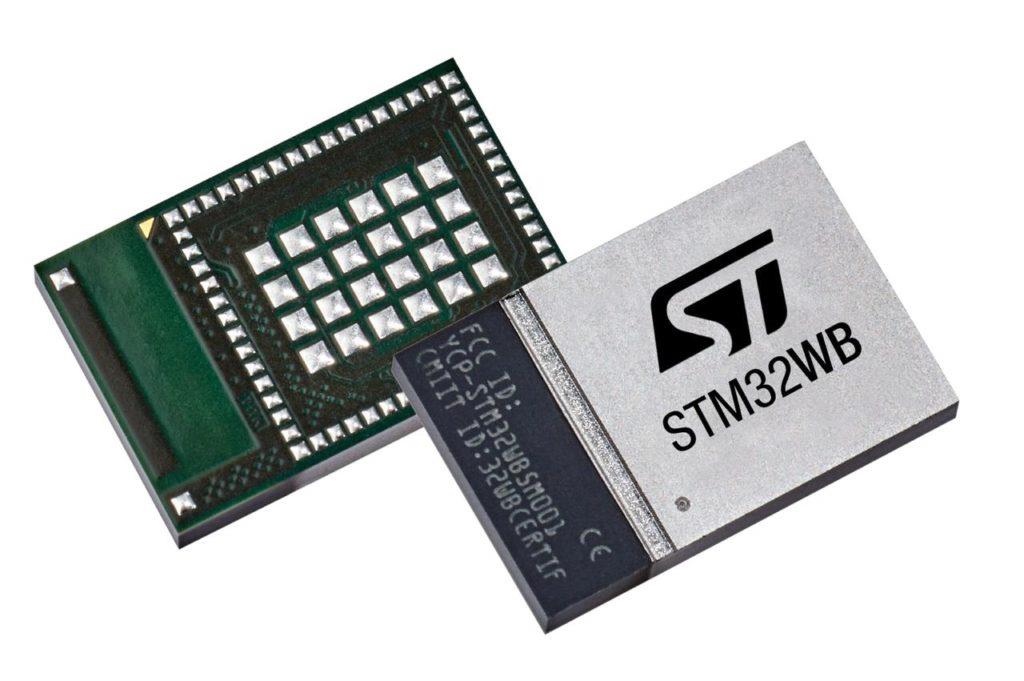
Integrated Bluetooth: Some STM32 models (like the STM32WB series) have built-in Bluetooth capabilities
External Bluetooth modules:
Standard STM32 MCUs can communicate with external Bluetooth modules via UART, SPI, or I2C
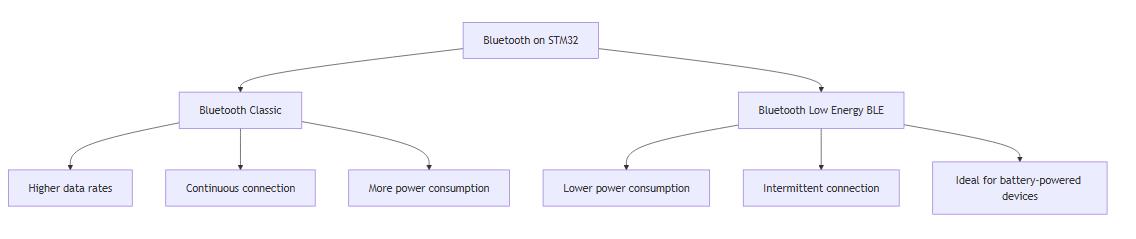
Bluetooth Classic
Better for continuous data streaming
Higher data rates (up to 3 Mbps)
More power-hungry
Suitable for audio streaming, file transfers
Bluetooth Low Energy (BLE)
Optimized for low power consumption
Ideal for battery-powered devices
Perfect for periodic data transmission
Lower data rates but sufficient for sensor readings and commands
Hardware Requirements
Option 1: STM32WB Series (Integrated Bluetooth)
The STM32WB series includes a dedicated radio processor alongside the main application processor,
making it an all-in-one solution for Bluetooth applications.
Key components:
STM32WB55 Nucleo board or similar
USB cable for programming
ST-LINK/V2 programmer (usually included with Nucleo boards)
Option 2: External Bluetooth Module with Standard STM32
For STM32 microcontrollers without integrated Bluetooth, you'll need:
Components:
Any STM32 development board (e.g., Nucleo-F401RE, STM32F4-Discovery)
External Bluetooth module (HC-05/HC-06 for Classic, HM-10/CC2541 for BLE)
Jumper wires
3.3V power supply (most modules are not 5V tolerant)
Setting Up Your Development Environment
Before writing code, you'll need to set up your development environment:
Install STM32CubeIDE or your preferred STM32 development platform
Install STM32CubeMX for visual configuration
Download the appropriate STM32 HAL libraries
For STM32WB series, install the STM32CubeWB package which includes Bluetooth middleware
Basic UART-Based Bluetooth Communication
Let's start with a simple example using an external Bluetooth module connected via UART.
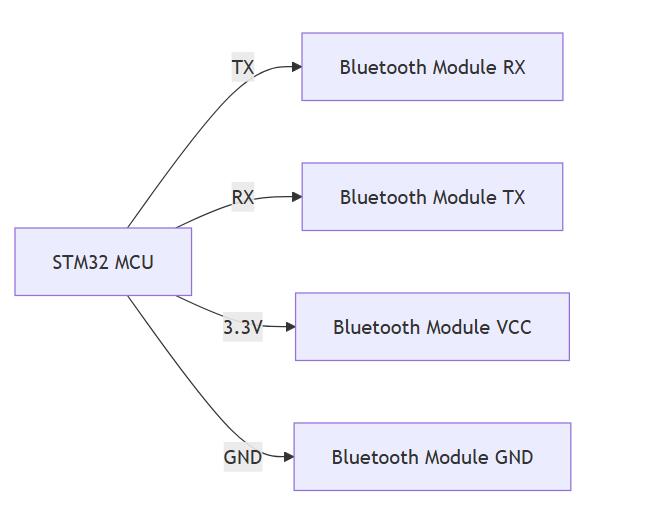
Hardware Connection
Connect your Bluetooth module to the STM32:
Connect module's RX pin to STM32's TX pin (e.g., PA2)
Connect module's TX pin to STM32's RX pin (e.g., PA3)
Connect module's VCC to 3.3V
Connect module's GND to GND
Code Example: Sending and Receiving Data via Bluetooth
/* Includes */
#include "main.h"
#include "stm32f4xx_hal.h"
#include <string.h>
/* Private variables */
UART_HandleTypeDef huart2; // UART for Bluetooth module
char rxBuffer[50]; // Buffer for received data
char txBuffer[50]; // Buffer for transmitting data
/* Function prototypes */
static void SystemClock_Config(void);
static void MX_GPIO_Init(void);
static void MX_USART2_UART_Init(void);
/**
* @brief Main function
*/
int main(void)
{
/* MCU initialization */
HAL_Init();
SystemClock_Config();
MX_GPIO_Init();
MX_USART2_UART_Init();
/* Prepare welcome message */
strcpy(txBuffer, "STM32 Bluetooth Demo\r
");
/* Send welcome message via Bluetooth */
HAL_UART_Transmit(&huart2, (uint8_t*)txBuffer, strlen(txBuffer), 100);
/* Main loop */
while (1)
{
/* Clear receive buffer */
memset(rxBuffer, 0, sizeof(rxBuffer));
/* Receive data via Bluetooth with timeout */
if (HAL_UART_Receive(&huart2, (uint8_t*)rxBuffer, 10, 1000) == HAL_OK)
{
/* Echo received data back with confirmation message */
sprintf(txBuffer, "Received: %s\r
", rxBuffer);
HAL_UART_Transmit(&huart2, (uint8_t*)txBuffer, strlen(txBuffer), 100);
/* Check for specific command */
if (strncmp(rxBuffer, "LED_ON", 6) == 0)
{
HAL_GPIO_WritePin(GPIOA, GPIO_PIN_5, GPIO_PIN_SET); // Turn LED on
strcpy(txBuffer, "LED turned ON\r
");
HAL_UART_Transmit(&huart2, (uint8_t*)txBuffer, strlen(txBuffer), 100);
}
else if (strncmp(rxBuffer, "LED_OFF", 7) == 0)
{
HAL_GPIO_WritePin(GPIOA, GPIO_PIN_5, GPIO_PIN_RESET); // Turn LED off
strcpy(txBuffer, "LED turned OFF\r
");
HAL_UART_Transmit(&huart2, (uint8_t*)txBuffer, strlen(txBuffer), 100);
}
}
HAL_Delay(10); // Small delay to prevent CPU overload
}
}
/**
* @brief UART2 Initialization Function
* @note Configured for 9600 baud, which is common for Bluetooth modules
*/
static void MX_USART2_UART_Init(void)
{
huart2.Instance = USART2;
huart2.Init.BaudRate = 9600;
huart2.Init.WordLength = UART_WORDLENGTH_8B;
huart2.Init.StopBits = UART_STOPBITS_1;
huart2.Init.Parity = UART_PARITY_NONE;
huart2.Init.Mode = UART_MODE_TX_RX;
huart2.Init.HwFlowCtl = UART_HWCONTROL_NONE;
huart2.Init.OverSampling = UART_OVERSAMPLING_16;
HAL_UART_Init(&huart2);
}
/* System Clock and GPIO initialization implementations */
/* ... (omitted for brevity) ... */
How It Works:
The program initializes the UART interface for communication with the Bluetooth module
It sends a welcome message over Bluetooth
It continuously listens for incoming Bluetooth data
When data is received, it echoes it back
It recognizes specific commands ("LED_ON" and "LED_OFF") to control an onboard LED
Testing This Example
Upload the code to your STM32 board
Open a Bluetooth terminal app on your smartphone or computer
Pair with your Bluetooth module (default pairing code is often "1234" or "0000")
Connect to the module
You should see the "STM32 Bluetooth Demo" message
Send "LED_ON" to turn on the board's LED
Send "LED_OFF" to turn it off
Basic BLE Server Example
This example creates a simple BLE server with a custom service and characteristic:
/* Includes */
#include "main.h"
#include "app_common.h"
#include "app_entry.h"
#include "app_ble.h"
#include "ble.h"
#include "stm32_seq.h"
#include "stm32wb5mm_dk.h"
#include "dbg_trace.h"
#include <string.h>
/* Private defines */
#define CUSTOM_SERVICE_UUID 0x1234
#define CUSTOM_CHARACTERISTIC_UUID 0x5678
/* Private variables */
uint8_t sensorValue = 25; // Sample sensor value
/* Function Prototypes */
static void SystemClock_Config(void);
static void Init_BLE(void);
static void UpdateCharacteristic(void);
/**
* @brief Main function
*/
int main(void)
{
/* Reset of all peripherals, Initializes the Flash interface and the Systick */
HAL_Init();
/* Configure the system clock */
SystemClock_Config();
/* Initialize LEDs */
BSP_LED_Init(LED_BLUE);
BSP_LED_Init(LED_GREEN);
BSP_LED_Init(LED_RED);
/* Initialize Bluetooth functionality */
Init_BLE();
/* Set up periodic timer for sensor updates */
UTIL_SEQ_RegTask(1<<0, 0, UpdateCharacteristic);
UTIL_SEQ_SetTask(1<<0, CFG_TASK_PERIOD_MS);
/* Infinite loop */
while (1)
{
/* Run the BLE stack tasks */
UTIL_SEQ_Run(UTIL_SEQ_DEFAULT);
}
}
/**
* @brief Initialize Bluetooth Low Energy
*/
static void Init_BLE(void)
{
/* Initialize BLE transport layer */
APPE_Init();
/* Register our custom service and characteristic */
aci_gatt_add_service(UUID_TYPE_16,
(const Service_UUID_t*)&CUSTOM_SERVICE_UUID,
PRIMARY_SERVICE,
7,
&service_handle);
aci_gatt_add_char(service_handle,
UUID_TYPE_16,
(const Char_UUID_t*)&CUSTOM_CHARACTERISTIC_UUID,
1,
CHAR_PROP_READ | CHAR_PROP_NOTIFY,
ATTR_PERMISSION_NONE,
GATT_NOTIFY_ATTRIBUTE_WRITE,
16,
0,
&char_handle);
/* Update initial characteristic value */
aci_gatt_update_char_value(service_handle,
char_handle,
0,
1,
&sensorValue);
/* Start advertising */
aci_gap_set_discoverable(ADV_IND,
0x0300,
0x0300,
PUBLIC_ADDR,
NO_WHITE_LIST_USE,
sizeof("STM32WB"),
(uint8_t*)"STM32WB",
0,
NULL,
0,
0);
/* Turn on blue LED to indicate advertising */
BSP_LED_On(LED_BLUE);
}
/**
* @brief Update BLE characteristic with new sensor value
*/
static void UpdateCharacteristic(void)
{
/* Simulate changing sensor value */
sensorValue = (sensorValue + 1) % 100;
/* Update characteristic value */
aci_gatt_update_char_value(service_handle,
char_handle,
0,
1,
&sensorValue);
/* Toggle green LED to indicate update */
BSP_LED_Toggle(LED_GREEN);
/* Schedule next update */
UTIL_SEQ_SetTask(1<<0, CFG_TASK_PERIOD_MS);
}
/* System Clock Config implementation */
/* ... (omitted for brevity) ... */
How It Works:
The program initializes the BLE stack on the STM32WB
It creates a custom service and characteristic
It starts advertising the device as "STM32WB"
It periodically updates the characteristic value (simulating a sensor reading)
The blue LED indicates the device is advertising
The green LED toggles when the characteristic value is updated
Testing the BLE Example
Upload the code to your STM32WB board
Install a BLE scanner app on your smartphone (like "nRF Connect" or "LightBlue")
Scan for BLE devices and connect to "STM32WB"
View the available services and characteristics
Read the characteristic value or enable notifications to see the value change in real-time
Let's build a more practical example:
a Bluetooth-enabled weather station that sends temperature and humidity data to a smartphone app.
/* Includes */
#include "main.h"
#include "stm32f4xx_hal.h"
#include "dht11.h" // DHT11 temperature/humidity sensor library
#include <string.h>
#include <stdio.h>
/* Private variables */
UART_HandleTypeDef huart2; // UART for Bluetooth module
DHT11_HandleTypeDef dht; // DHT11 sensor handle
uint8_t temperature = 0;
uint8_t humidity = 0;
char txBuffer[100]; // Buffer for transmitting data
uint32_t lastUpdateTime = 0;
/* Function prototypes */
static void SystemClock_Config(void);
static void MX_GPIO_Init(void);
static void MX_USART2_UART_Init(void);
static void DHT11_Init(void);
static void SendSensorData(void);
/**
* @brief Main function
*/
int main(void)
{
/* MCU initialization */
HAL_Init();
SystemClock_Config();
MX_GPIO_Init();
MX_USART2_UART_Init();
/* Initialize DHT11 sensor */
DHT11_Init();
/* Prepare welcome message */
strcpy(txBuffer, "STM32 Bluetooth Weather Station\r
");
HAL_UART_Transmit(&huart2, (uint8_t*)txBuffer, strlen(txBuffer), 100);
/* Main loop */
while (1)
{
uint32_t currentTime = HAL_GetTick();
/* Update and send sensor data every 10 seconds */
if (currentTime - lastUpdateTime >= 10000)
{
SendSensorData();
lastUpdateTime = currentTime;
}
/* Small delay */
HAL_Delay(100);
}
}
/**
* @brief Initialize DHT11 temperature/humidity sensor
*/
static void DHT11_Init(void)
{
/* Configure DHT11 on pin PA1 */
dht.GPIOx = GPIOA;
dht.GPIO_Pin = GPIO_PIN_1;
DHT11_Init(&dht);
}
/**
* @brief Read and send sensor data via Bluetooth
*/
static void SendSensorData(void)
{
/* Read data from DHT11 sensor */
if (DHT11_ReadData(&dht, &temperature, &humidity) == DHT11_OK)
{
/* Format data as JSON */
sprintf(txBuffer, "{\"temp\":%d,\"humidity\":%d,\"timestamp\":%lu}\r
",
temperature, humidity, HAL_GetTick());
/* Send data via Bluetooth */
HAL_UART_Transmit(&huart2, (uint8_t*)txBuffer, strlen(txBuffer), 100);
/* Toggle LED to indicate data was sent */
HAL_GPIO_TogglePin(GPIOA, GPIO_PIN_5);
}
else
{
/* Error reading sensor */
strcpy(txBuffer, "{\"error\":\"Failed to read sensor\"}\r
");
HAL_UART_Transmit(&huart2, (uint8_t*)txBuffer, strlen(txBuffer), 100);
}
}
/**
* @brief UART2 Initialization Function
*/
static void MX_USART2_UART_Init(void)
{
huart2.Instance = USART2;
huart2.Init.BaudRate = 9600;
huart2.Init.WordLength = UART_WORDLENGTH_8B;
huart2.Init.StopBits = UART_STOPBITS_1;
huart2.Init.Parity = UART_PARITY_NONE;
huart2.Init.Mode = UART_MODE_TX_RX;
huart2.Init.HwFlowCtl = UART_HWCONTROL_NONE;
huart2.Init.OverSampling = UART_OVERSAMPLING_16;
HAL_UART_Init(&huart2);
}
/* System Clock and GPIO initialization implementations */
/* ... (omitted for brevity) ... */
How It Works:
The program initializes the UART for Bluetooth communication and the DHT11 sensor
Every 10 seconds, it reads temperature and humidity data
It formats the data as a JSON string for easy parsing by the receiving application
It sends the data via Bluetooth
It toggles an LED to indicate data transmission
Troubleshooting Bluetooth Connections
When working with Bluetooth on STM32, you might encounter these common issues:
Connection Problems
Issue: Cannot discover or connect to the Bluetooth device
Solutions:
Verify power connections (3.3V and GND)
Check UART connections (TX to RX, RX to TX)
Confirm baud rate settings match between STM32 and module
Ensure the Bluetooth module is in discoverable mode
Data Transmission Issues
Issue: Connected but not receiving data
Solutions:
Verify UART initialization parameters
Check buffer sizes and overflow conditions
Confirm transmit/receive timing
Use an oscilloscope to verify UART signals if possible
Power-Related Issues
Issue: Unstable connection or frequent disconnects
Solutions:
Ensure adequate power supply current capacity
Add appropriate decoupling capacitors
Keep Bluetooth antenna away from metal objects and power lines
Reduce transmission power if signal integrity is good
Sleep Mode Management
For battery-powered applications, implement sleep modes:
/* Enter low-power mode when inactive */
void EnterLowPowerMode(void)
{
/* Send command to put Bluetooth module in sleep mode */
HAL_UART_Transmit(&huart2, (uint8_t*)"AT+SLEEP\r
", 10, 100);
/* Wait for acknowledgment */
char response[10];
HAL_UART_Receive(&huart2, (uint8_t*)response, 5, 100);
/* Enter STM32 low-power mode */
HAL_PWR_EnterSTOPMode(PWR_LOWPOWERREGULATOR_ON, PWR_STOPENTRY_WFI);
Summary
In this tutorial, you've learned the fundamentals of implementing Bluetooth connectivity on STM32 microcontrollers:
Understanding the differences between Bluetooth Classic and BLE
Setting up hardware for both integrated and external Bluetooth solutions
Writing code for basic UART-based Bluetooth communication
Implementing a BLE server with custom services and characteristics
Building a practical Bluetooth weather station application
Troubleshooting common Bluetooth issues
Implementing advanced features like power management and security
By mastering these concepts, you can add wireless communication to your STM32 projects,
enabling them to interact with smartphones, computers, and other embedded systems without physical connections.